
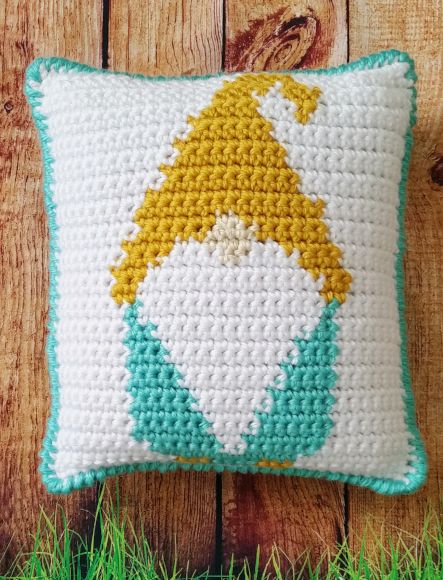
Today I am sharing a free pattern for a Gnome Crochet Pillow. Do you remember the Gnome Wall Hanging pattern I posted a few weeks ago? I think we all knew it was only a matter of time before I made that cute little gnome into a crochet pillow! I did want to make this pillow a little bit easier for any beginners out there, so I nixed the lattice work portion of the original design, and have also shared a graph!
I’m sure it comes as no surprise that I used my favorite super bulky yarn – Lion Brand Hometown – for this crochet pillow. In fact, I used these exact colors in another project, my Southwestern Stripes Scarf! I really love this bright and cheerful color combination.
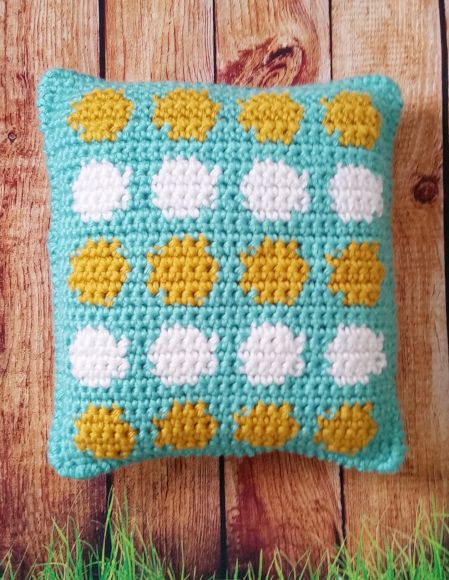
For the back side of the pillow, I went with a fun polka dot design. If you are interested in making one of your own, read on!
PIN for later HERE
ADD to your Ravelry que HERE
Disclaimer: This post contains affiliate links. When you purchase something using these links a small amount of the sales price goes to me to help keep this site, and the patterns on it free. You do not pay any extra for the item you purchase.
Gnome Crochet Pillow
Materials Used:
- 2 skeins Lion Brand Hometown – New York White
- 1 skein Lion Brand Hometown – Miami Seafoam
- 1 skein Lion Brand Hometown – Madison Mustard
- 9.00 mm crochet hook
- 14″ x 14″ pillow form
- Tapestry needle
Abbreviations:
ch(s) = chain(s)
st(s) = stitches(s)
sc = single crochet
sl st = slip stitch
American crochet terms used throughout
Gauge:
4″ x 4″ = 9 sc, 11 rows
Finished Size Approximately:
14″ x 14″
Instructions:
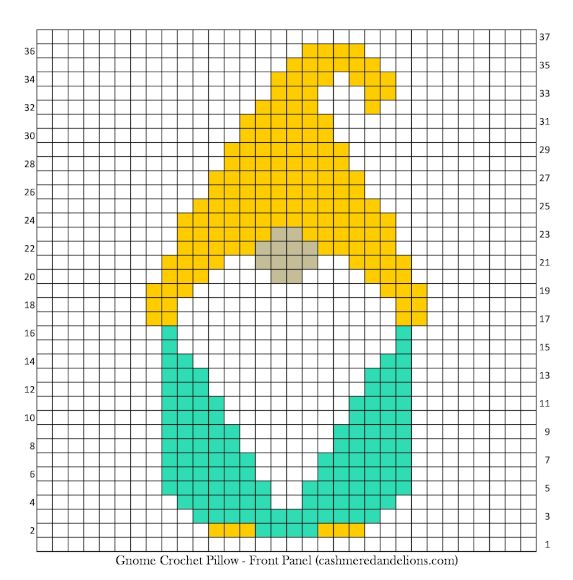
To make the front panel:
Row 1:
With New York White, chain 33. Sc in the 2nd ch from the hook and in each ch across, turn. (32 sts)
Rows 2-37:
For rows 2 – 37, follow the graph below. Each square on the graph represents 1 sc. Work the odd rows by reading the graph from right-to-left, the even rows by reading the graph from left-to-right, and so forth. Change colors as indicated by the graph. Any color not in use will be dropped and picked back up when needed. Make sure you always drop the yarn to the back side (wrong side) of the panel. When you have completed the pattern on the graph, fasten off and weave in all ends.
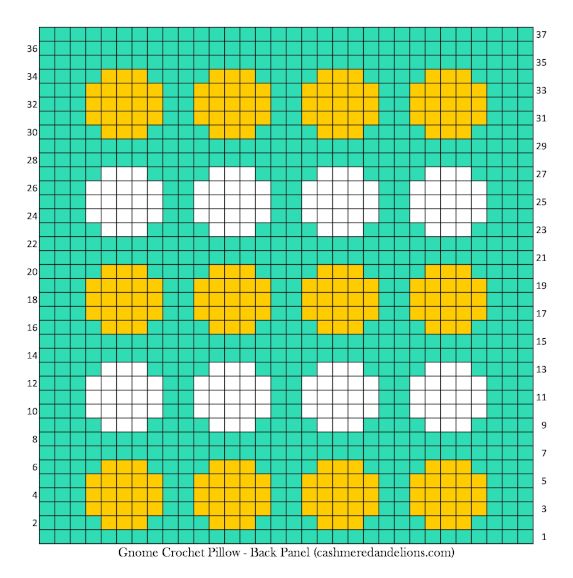
To make the back panel:
Row 1:
With Miami Seafoam, ch 33. Sc in the 2nd ch from the hook and in each ch across, turn. (32 sts)
Rows 2-37:
For rows 2 – 37, follow the graph below. Each square on the graph represents 1 sc. Work the odd rows by reading the graph from right-to-left, the even rows by reading the graph from left-to-right, and so forth. Change colors as indicated by the graph. Any color not in use will be dropped and picked back up when needed. Make sure you always drop the yarn to the back side (wrong side) of the panel. When you have completed the pattern on the graph, fasten off and weave in all ends.
To attach the front and back panels:
With right sides facing out, line up the front and back panels. Attach Miami Seafoam to any corner and work one round of crab stitch (also known as reverse single crochet) through both panels around three of the edges. Insert pillow form. Continue working crab stitch until you have worked around the entire perimeter of the pillow, sl st to beginning and fasten off. Weave in ends.
Want to be notified when I post new crochet patterns?
Join Me on Social Media
If you make the Gnome Crochet Pillow, I’d love to see a picture of it when you’re done. You can tag me @cashmeredandelions on Instagram!
You can also follow me on Pinterest, Instagram and Ravelry for more beautiful crochet patterns.
This is absolutely adorable! I wish I had found it in time for Christmas 2019! But it is definitely on my list for this year! Thank you so much for this free pattern. Gnomes are the best!!!!